I finally got around to assembling a stand alone version of the RBox. As some of you correctly noted building a videogame for the price of a latte that depends on a $30 dev kit is cheating a bit. This version is self contained and while not practical or useful it is at least fun to build.
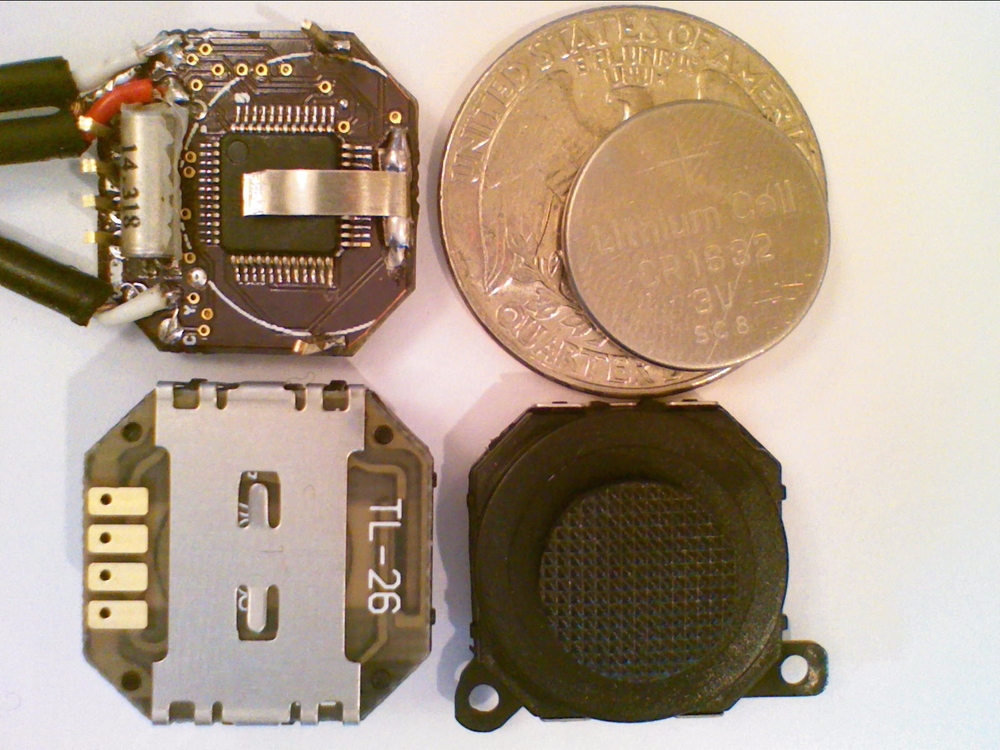


The design sandwiches a lithium button cell between the psp joystick and the pcb. It adds a single button that serves as both the power switch and a fire button. 2 axis control + fire may seem a modest level of input but modern standards but if it was good enough for Atari is is good enough for me.

Thin bendy metal on top of the cpu and on the bottom of the joystick provide a suprisingly effective friction fit for the CR1632 battery. Don’t try to solder directly to the metal on the bottom of the joystick. When running a game and playing audio the device uses about 28ma so I get about 4 hours of continuous use from the CR1632. Feel free to use a CR1616 or CR1620 for a slimmer look and more frequent battery replacement.


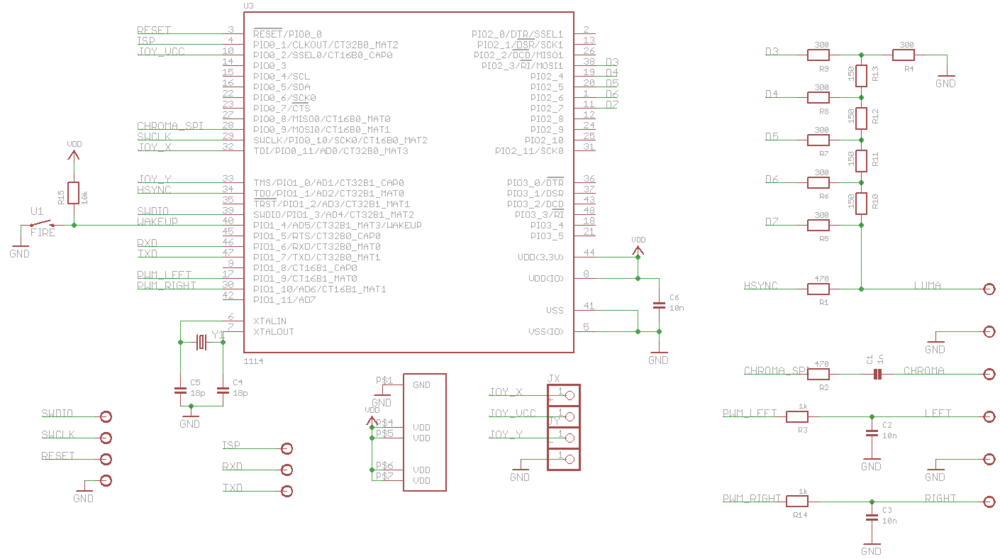
The schematic is virtually identical to the prototype with a few exceptions. The joystick VCC line is connected to a GPIO rather than VCC to reduce power during normal operation and especially during deep power down. The fire button is connected to the WAKEUP pin that brings the beast back from deep power down. The code will deep power down the RBox after 3 minutes of inactivity. While turned off the RBox uses about ~200na as far as I can measure on my crappy meter. The board supports both composite and s-video.

If you don’t feel like making your own pcb order them from http://dorkbotpdx.org/wiki/pcb_order. This is simply the cheapest and best way of getting pcbs in small volume. Nobody else comes close. Unless you really like what ferric chloride does for your sneakers there is no reason not to use these guys.
New code, schematic and pcb posted on https://sourceforge.net/projects/rbox/. If you would like a kit post a comment and if there is lots of interest I will see if I can get one organized.
Until next time

Extremely awesome!
I ordered PCBs from Dockbot. I’m wondering how do you program this? Is there an ISP header?
Genial!
@Reed Header might be too strong a word. It has pads for both serial isp and Cortex SWO/SWCLK. Right now I just tack on 0.1 header to either to reprogram but I recognize that is less than ideal. I am making a little programming dock that uses a cheap USB serial cable (http://shop.ebay.com/i.html?_nkw=Nokia+CA-42) but it is still a work in progress.
The board looks so cool
This stuff is exactly what I wanted to work on since I was a kid. Now that it’s affordable, I may just start.
Cool. This is much more miniature than the uzebox.
Wonder how you’re doing composite video. Tried the same SPI technique you’ve done but with composite video and color changes are nasty. There are bright / dark colored strips everytime there is a color change.
I traced the reason. It looks like you’re using 228 sub-carrier cycles per line while the NTSC spec states that you have to use 227.5 sub-carrier cycles per line. Using 228 cycles destroys the clever spectral interleaving in NTSC. Ofcourse, this wont be noticed if using S-Video.
Using 227.5 will require both color burst and chroma inversion on every other line. Dont suppose this is feasible. Looks like I’ll try PWM or some other technique for color generation.
Any tips/materials/tutorials/links on 3D ? Being an electrical engineer, I have no clue about computer graphics. I’d be grateful if you could give me a few starting pointers.
Whats the polygon render rate in the RBox ? Is it capable of something like DOOM ?
Very nice!
Can you develop on why the 0VideoOut.c needs to be linked first and why moving the code around in flash or changing the optimizations has to do with the chroma phase (byte alignment, flash wait cycle…)?
The topic that your blog deals with demands loads of research. Thanks to you who has provided the intricate information in simple words.
child abuse essays | civil war essays
i would like a kit!
what kind of compiler do you use? lpcxpresso IDE cant compile the imported c++ files. I’m really stuck here
@boyko the free IDE does not support cpp unless you ask it nicely. You should be able to compile the project with the free IDE even though it has cpp code inside c files. Look at the compiler settings in that project (-x option in particular) to see how it works.
Very interesting project you have here! I finished building one of my own today and noticed that my battery life using a CR1632 is more like 30 min. than the 4 hours advertised.
@Kyle Awesome!. Battery life seems a little low .. what current consumption are you measuring? There is about a factor of two variance in batteries from different lots but 30mins sounds low.
I’m measuring ~23mA on my RBox; the problem seems to be with the CR1632’s I’m using (apparently they’re 140mAh, but can only have a continuous drain of 0.1mA http://industrial.panasonic.com/www-data/pdf2/AAA4000/AAA4000CE46.pdf) What brand of CR1632’s did you use?
I would love a kit. I’m probably going to order a PCB and try to build one soon.
I would love to see a kit. Honestly I would buy a few, make some simple game to run on them, and send them to my nephews as xMas presents.
Hell they might BE my xMas cards 😉