A tiny working model of a retro computing icon offers a blend of nostalgia and sillyness.

My first computer was an Atari 400. My first disk drive was the magnificent Atari 810. Overwhelmed by a recent wave of nostalgia from playing Zork for the first time in 30 years I have built a working model of an Atari 810 that uses 8Gig microSD cards instead of 5 1/4 inch floppies to emulate up to 8 drives. Maintaining the relative dimensions of drive to media, the model is somewhat smaller than the original.


Some numbers
The original 810 managed 90k per disk and had a volume of about 30,000 cm3. Assuming a 8Gig card the new version can store about 90,000 disks and at 5 cm3 only takes up 0.000167 times as much space. So it is a lot bigger and a lot smaller. Progress eh?
How it works
The Atari 810 (and subsequent 1050) drives are “smart” serial peripherals. The Atari OS communicates drives, printers, modems and devices using the SIO (“Serial Input/Output”) protocol. SIO devices connected to the Atari with a chunky 13 pin connector.
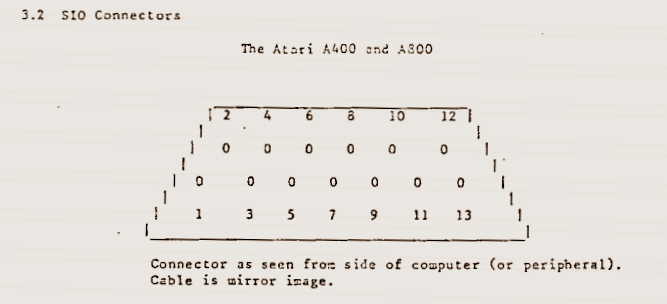
The Atari addresses 5 bytes commands to peripherals by lowering pin 7 (Command) and transmitting 19200 baud asynch serial on pin 5 (Data Out). If the peripheral recognises the command (‘1′,’R’,1,0 for a read from disk 1, for example) it acknowleges the command and responds with data on pin 3 (Data In) at a pokey 19200 baud by default. Pin 10 can supply 50ma of 5v.

Hardware
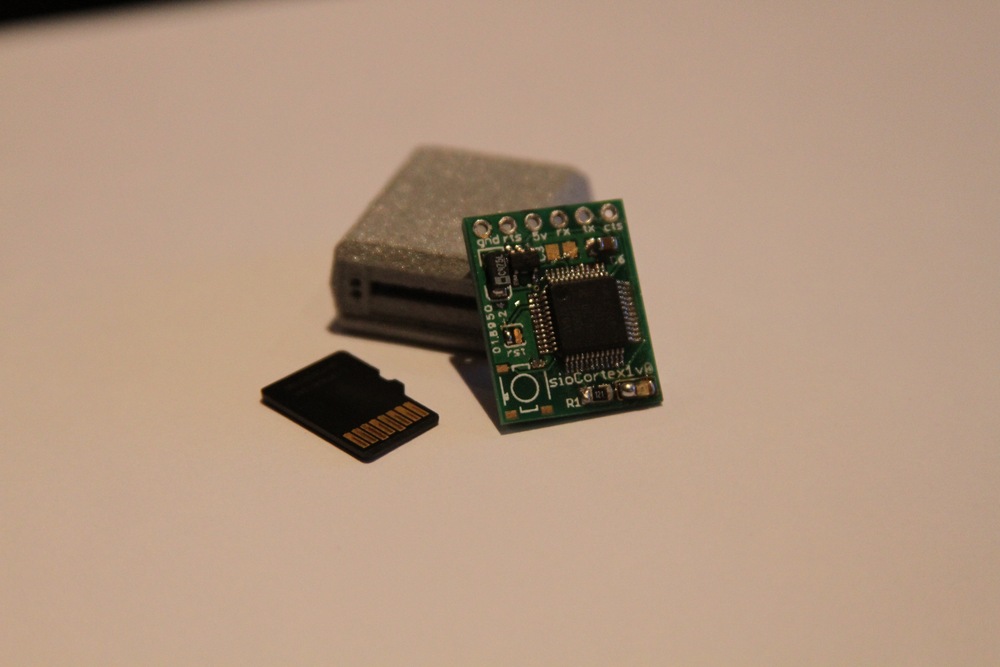
The hardware is pretty simple: a LPC1114 microcontroller, a microSD slot, a 3v3 regulator, a led and some caps. I used the 1114 because they are cheap and I had them lying around after building the Wikipedia reader: just about any 3v3 micro with SPI and a UART would also work fine.


The enclosure is a 3D print from Shapeways. This is the first time I have used them and I have to say I was delighted bt the experience. My inexperience in 3D modeling is evident but Shapeways sent me a lovely collection of little enclosures in various materials. I tried to make it as small as possible and still accomodate the microSD card. Testors enamel completed the look (make sure you mix in some olive with the light tan and cream).

Software
The microcontroller code emulates up to 8 Atari drives. At power on it checks for a microSD card, mounts a Fat16 or Fat32 file system and scans the card for .ATR and .XFD disk image files commonly used with Atari emulators. It also looks for XEX files which are Atari executables, another emulator mainstay. The code then “inserts” the BOOT.RUR image into drive 1 and waits for the Atari to start sending commands during bootup.
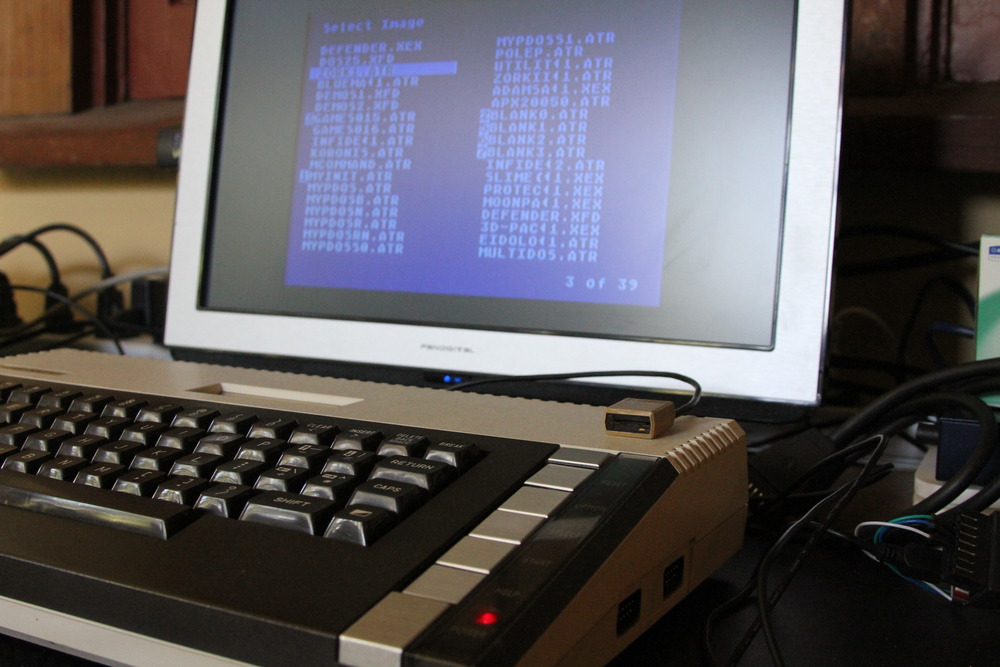
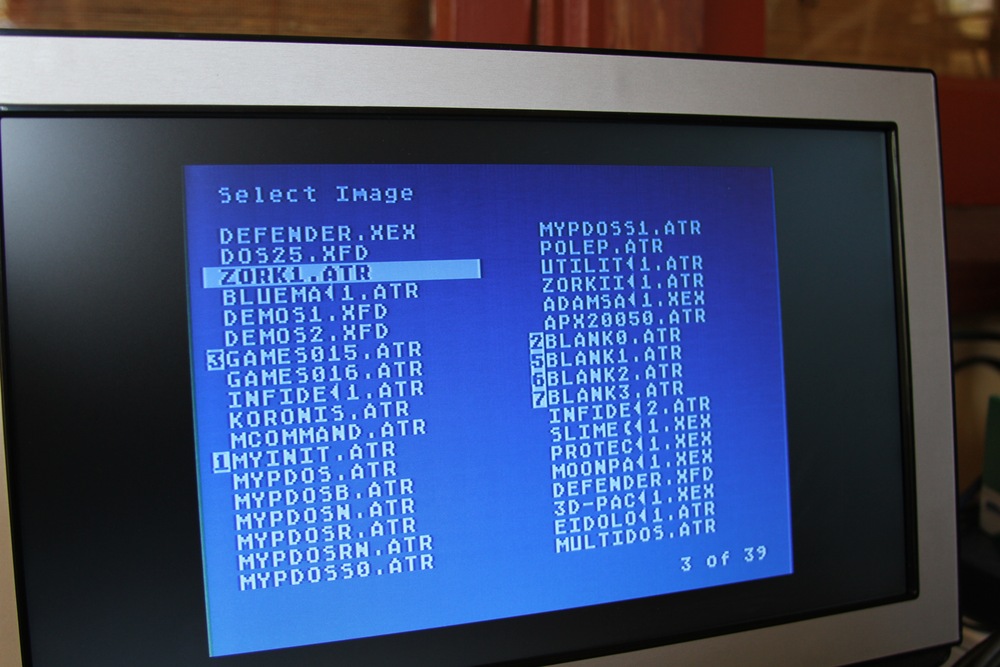
BOOT.RUR is a UI app written in C and compiled with cc65. Because the drive has no input or display we use this app running on the Atari to select disk images or applications. Cursor keys select the image or xex application, moving off the left or the right edge of the screen will page the list. Keys ‘1’ …’8′ will insert the selected item into drives ‘1’..’8′. The space bar will eject the disk, the return key will boot the selected image or xex. If an xex is selected, the firmware will synthesize a kboot disk image to load and execute it.
It is electrically possible to write an Atari app that can reflash the firmware but so far this is left as an exercise to the reader. The board pinout happens to be the same as a FTDI serial cable so inital firmware downloads can happen through FlashMagic.
As noted earlier, 19200 baud is pretty pokey by modern standards. Other drive and dos vendors came up with various tricks to make the serial run at 38400 or 57600 or beyond. This board supports a common 57600 baud mode so if you tire of the nostalgic thweep-thweep-thweep you can speed things up a bit by using MyPicodos or similar.
There are lots of good commercial and open source emulators and serial cables that are much more complete (and a little more practical) than this one. I am amazed at the continuing innovation on this platform: check out Yoomp and Crownland and compare them to titles released in the 80s.
3D model, PCB, schematics, NXP and Atari code on github shortly.
3D model, PCB, schematics, NXP and Atari code at https://github.com/rossumur/littleatari810
Until next time,
Rossum

Sign me up for the scale model of the keyboard.
This too awesome for words. Great job!
I want one for my Apple ][.
I bow to your ingenuity, cleverness, tilted thinking and sheer audacity to do the miniture…
AWESoMMMMMMMMMMMMMME!!! 🙂
invokage to godlyhood NOT to be inferred! tyvm. 🙂
I bow to your ingenuity, cleverness, tilted thinking and sheer audacity to do the miniture…
AWESoMMME!!! 🙂
invokage to godlyhood NOT to be inferred! tyvm. 🙂
Seriously, I need to buy one of these, as a kit or preferably built complete, and so do a lot of people over on Atariage.com
Suuper Cute
Is there a URL so anyone can get a 3D print?
verrry nice job done 😉
im jealous, the atari 400 was my first drug too,
and i always wanted to bild a small sd-emu over the last couple of years 🙂
Im sure, the old 8bit hardware will last forever – compared to all the new hardware stuff we now have… so the only topic to solve are these old floppy drives.
Thanx for your short & good documentation!
i loooove your enclosure desing 😉
Still looking for a good FPGA port for the atari8.
So it would be possible to build the “main machine” with the same shrink-factor as your floppy design 😉
This is just plain ossm.
http://www.atariage.com/forums/topic/181513-tiny-atari-810-drive/page__pid__2274543#entry2274543
we want to buy them 🙂
WOW! I would like to purchase one from you too! I can do without the enclosure if thats a limiting issue for you. MikeMontana @ hotmail . com
This is great. Any chance you’re located in the northeast / mid-Atlantic parts of the USA? If so then I’d like to ask you some questions — please email me; evan (at) snarc.net — thank you.
Sweet. When does it ship?
Eagerly awaiting the schematics drop.
Please feel free to elaborate with more details about development, testing, debugging etc. This is fascinating stuff to read, and hardware development is just beyond the reach of many nostalgia computer users.
What is the approximate build cost per board?
Did you hand solder this or is this a reflow job? Or is that a stock target board?
Thanks for this..
A really nice piece of tech. Please let me know if you ever decide to produce/sell these, I would love to get one for my Atari 800 XL (which has a broken floppy AND tape deck ) fishguy876 [at] cvgm.net Thanks!
WOW.
Its really a lovely post. Keep it up.
Generic Viagra
It’s a very nice blog you share. i am very impress on you. really you done a great job here. Thank you very much….
Cheap Viagra
I have seen and visited your blog which contain useful information about a tiny retro mdel of computer.Also i shared this information to my friends.
Order generic viagra
Great going! Thanks for sharing the another informative post.I think this is the info which I am looking??Keep sharing such a informative post again.
Generic Viagra Soft Tabs Online
Would this work with a 1040 ST ?
I have one in great working condition, bought primarily to run a fantastic program called Notator (music sequencer)
Mike
Awesome project. Any chance to get firmware and PCB files?
This is ingenious Rossum, Is there any chance you could make me one of these? The Atari 400 was also my first ever computer system & am presently about to purchase one. This would really make a great addition & save me from having to pay for expensive 5.25″ Floppies. I really like the nostalgia & teh to scale replica of the Atari 810 5.25″ Drive. This is awesome !
Retroflashes.com has about 10 more mini old computers
hello, after 3 years of your posting, I have a question for you… do you have this little great piece of hardware to sell? (I hope so) please let me know! thank you!
Did the schematics/source ever make it up on github? Thanks!
Odd. Seems like I never actually posted it! I will dig it up this weekend. thx much.
Just a friendly ping to see if you had any luck excavating the project? (Can’t tell I’m eager to mess with it or anything.) 😉 TIA!
Finally found it. Funny how the next week thing can turn into 5 years. 3D model, PCB, schematics, NXP and Atari code at https://github.com/rossumur/littleatari810. cheers.
Yay! Thanks!
Good article!
Hi,
Awesome! Where do you get the micro SD card connector? Thanks!
Hi,
I found your commits from https://github.com/rossumur/littleatari810. I am trying to build one, and got the LPC1114 flashed with the .bin file, but nothing happens when the device is connected to the Atari 800XL’s SIO port. So, I am trying to do debugging by blinking the status LED. For that I have to recompile the code.
What IDE/compiler toolchain did you use? Thanks!
Don’t bother or waste your time to build from the source code hosted on the github site with NXP’s IDE, folks. It won’t compile, because of the below undefined SYSTICKCLKDIV symbol.
LPC_SYSCON->SYSTICKCLKDIV = 0x02;
I think the author (Rossum) created this, like his other projects, but will not give technical support/answers.
I made a board, and am not able to get it to work.